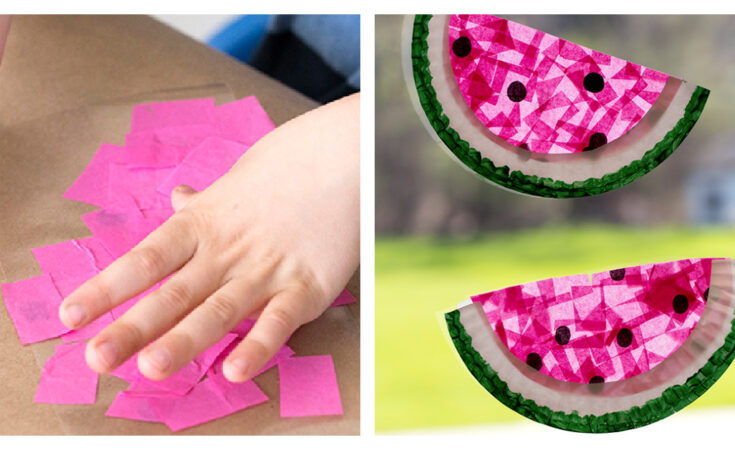
Celebrate summer by creating adorable Paper Plate Watermelon Suncatchers with the kids. This suncatcher craft requires minimal supplies and look bright and cheery hanging on windows! Kids of all ages will love to make these easy crafts.

Easy Suncatcher Craft for Kids
One of my family’s favorite things about summer is fresh, pink, juicy watermelons! Perhaps the epitome of summer ”picnics, parties, and cookouts would not be complete without them.
This craft is easy and fun to make! This watermelon craft preschool kids can do will require some assistance, but older children should be able to make it independently.
This article contains affiliate links.
Paper Plate Watermelon Suncatchers
These watermelon paper plates are really the cutest thing. The sun makes the “fruity” part of this watermelon activity look so vibrant. The watermelon seeds really pop out against the pink as does the rind!
Which is even has the white part of the rind on it. Most watermelon activities only have a green rind, so I appreciate the realistic touch on this one.
Related: Watermelon Counting Game
This fun watermelon suncatcher is super easy to make and actually doesn’t require too many crafting supplies.
Supplies Needed To Make Watermelon Paper Plate Suncatchers
How To Make A Watermelon Paper Plate Suncatcher:
Step 1
Cut the paper plate in half. Next, cut off the “plate” part leaving only the textured rim.
Paint the bottom half of the textured rim green.

Step 2
Next cut a small rectangle of clear shelf liner (enough to fit inside the space in your paper plate).
Invite your child to cut small circles from the black tissue paper and place them directly onto the sticky side of the shelf liner.

Step 3
Next, place small squares of pink tissue paper onto the sticky side of the shelf liner.
When the shelf liner is covered, cut another small rectangle (about the same size) and place it over the tissue paper. Trim any ragged ends.
Step 4
Place the tissue paper rectangle into the paper plate (seed side out) and secure it with tape. Trim off excess edges to create a watermelon slice.

Step 5
Hang in the window with tape and enjoy!
All Suncatcher Craft STeps Shown Here

Materials
- pink tissue paper (cut into 1 inch squares)
- black tissue paper (cut into small circles)
- white paper plates
- adhesive clear laminate shelf liner
- green paint and a paint brush
- tape
- scissors
Instructions
- Cut the paper plate in half.
- Next, cut off the “plate” part leaving only the textured rim.
- Paint the bottom half of the textured rim green.
- Next cut a small rectangle of clear shelf liner (enough to fit inside the space in your paper plate).
- Invite your child to cut small circles from the black tissue paper and place them directly onto the sticky side of the shelf liner.
- Next, place small squares of pink tissue paper onto the sticky side of the shelf liner.
- When the shelf liner is covered, cut another small rectangle (about the same size) and place it over the tissue paper.
- Trim any ragged ends.
- Place the tissue paper rectangle into the paper plate (seed side out) and secure it with tape.
- Trim off excess edges to create a watermelon slice.
- Hang in the window with tape and enjoy!

More Suncatcher Crafts From Kids Activities Blog
Looking for more fun suncatcher crafts? We’ve got so many awesome ideas for you to choose from!
Did you make this watermelon suncatcher? How did it turn out? We’d love to hear from you down below!


